How to Add a Custom Signature to your Blog

Recently I have been asked by quite a few people how to do certain things on blogger. While I am just about to make a switch over to Wordpress, I thought I would share what limited information I have been able to figure out in my time on Blogger.
Keep in mind, there are fantastic designers out there who are more than willing to help you with things like this if you have the money to do so, or just don't have the time to do it yourself.
I really love Becca over at Jumping Jax Designs. She can help you with your project small or large.
But if you want to do it on your own there are lots of tutorials online to help you out. If you are like me though - just seeing code and html isn't going to do you any good. I am a visual person.
If you aren't a visual person, and seeing it laid out without pictures is easier for you head over here. It was a great help to me, I just felt like it needed to be done in pictures.
So I have another blog - it is called Simple Gift ~ Stories from Breastfeeding Mamas. It is a place to share your breastfeeding story no matter what it may be with no judgment. I decided I needed a signature at the end of each post.
I headed over to Picnik and started to create my signature. If you haven't played around on Picnik I highly recommend it. Lots of fun. It is free, but they also have an upgrade option which I have found to be extremely worth it as much as I use it.
Not 5 minutes later I came up with this little ditty! I like it!
 So now I will be integrating putting the signature into the HTML of my blog. Really people, this is way easier then I imagined.
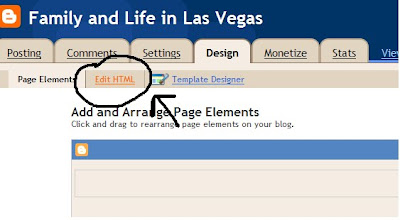
First, go to the Design tab in your Blogger Desktop. See where it says Edit HTML. Click that.

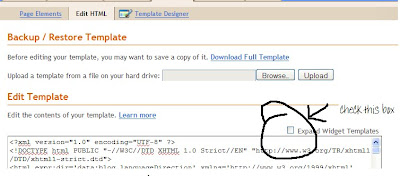
After you have Downloaded your template you can proceed to the fun stuff. Check the box where it says Expand Widget Templates.
 Now that the box is checked you are going to press "ctrl F"(do this by holding the control button and the F key together)
Doing so will bring up a tool bar on the bottom of your screen. It will look like this:
 Now in the find box enter the following text: <div class='post-footer-line post-footer-line-1'> (you can copy and paste it to go faster)
If that doesn't come up, head over to Blogger Plugins for the two other code searches.
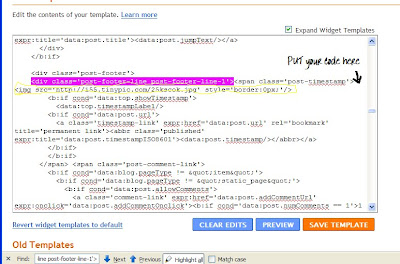
 Once you have found that you are going to add your image code to the end of that code.
(img src='url_of_your_signature_image' style='border:0px;'/) Just replace the ( ) with <>
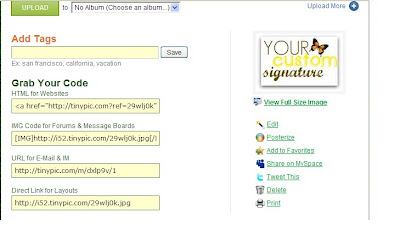
Insert your Direct Link for layouts in the bolded field:
(img src='url_of_your_signature_image' style='border:0px;'/) again replace the ( ) with <>
It will now look like this:

Finally add it in after the code!
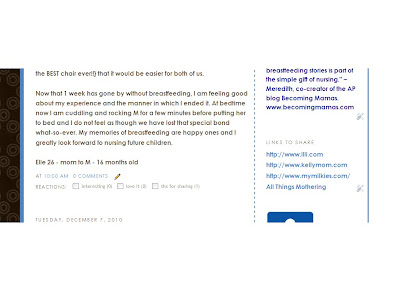
This was my blog before I added a custom signature.
 This is my blog with the custom signature! Easy Peasy!!
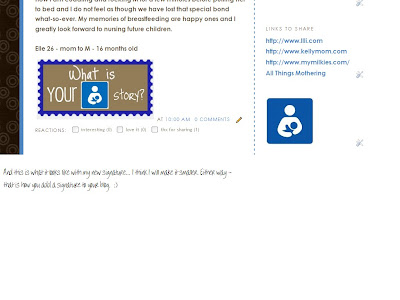
I will most likely go back and make my signature smaller, but that is a pretty easy fix now that I know how to do it.
I really hope this picture tutorial helps. I relied a lot on help from other bloggers when I first started out. Just trying to do the same for others.
Thanks to Blogger Plugins for the codes needed to do this picture tutorial!
Labels: Blogger Tutorial, Top Tips

3 Comments:
Thanks so much for this tutorial (bookmarked it), and also thanks for stopping by and following my blog. I'm now following you :)
Thanks for this tutorial...I'm going to have to try this out! I always thought it'd be too hard for me to do but now I know it's not that bad. Thanks!
just so you know - your twitter icon on the right sidebar does not go through - the link is wrong!!
Post a Comment
Subscribe to Post Comments [Atom]
<< Home