Tuesday, January 4, 2011

Daily Vegas ~ Handmade Felt Flower Headband

I am really trying to find time to craft more. Even though I am not very good at a lot of it, it really does help me de-stress. I find myself crafting most when things aren't going very well for me. I guess the process of making something by hand helps me to re-focus.

This week was a playgroup friend's 2nd birthday. I thought it would be nice to make her a felt flower headband.

It was super easy, lots of fun, and rewarding all at the same time.

In case you didn't know, I have a little obsession with headbands, ruffles, and girly things. It wasn't always this way, but for the past couple of years I have really gotten into it. Settling into my own style I suppose.

So here is my final product.


I am linking up at Skip to My Lou for Made by You Mondays! And Made with Love Monday at Sew Chatty!

Slowly but surely I am finding my crafty side.

Labels: , ,

Monday, December 27, 2010

Recycled Christmas Cards Placemats ~ Green So Easy


I keep all the Christmas Cards we get every year. I keep the photo ones, and the regular ones.

This year I noticed my stash of cards was getting a little thick, so I decided we should make a craft from them.


Since I was going to be hosting a Christmas Dinner, doing place mats seemed like a perfect idea!!
I hope you enjoy Squish's Recycled Christmas Card Place Mats!


We started with some Recycled paper. I bought a big roll of it. I plan on using it for all of our wrapping and crafting needs.

I laid it our on our floor, and taped the ends down. I then laid out some colored paper.


I cut some shapes using Christmas Cookies and Sponges. I actually will probably use thicker sponges next time, but in a pinch this worked okay.


I made sure I had a bath ready to go. (We were painting right outside the bathroom too so I was sure to contain the paint to one main area.)

I then stripped the Squish down to his diaper. In the future I will either use a disposable for the craft, or if I am not going to take pictures, I may just let him go at it sans clothing.


I released the Squish, and let him go to town. I got in on the fun too, and we had a blast. The paint was washable and non-toxic.

If you are going to do this project with a child as young as mine, I say embrace the mess and just have fun!


After a bath and a day to let the paper dry, I folded the brown paper in half, and cut it into 3 segments. I then cut those segments in half using the fold as my guide.

The nice thing about this project is it really is a kids project, so perfection isn't needed!


I selected 6 cards from our stash to use for the place mats, cut some ribbon, and glued them on.

I took them to a Office Supply Store, and trimmed them down, then had them laminated in an 11x17 sheet.


I am pretty happy with how they turned out!


I know my guests and family also enjoyed them. I love how you can see Squishy's footprints on them too! Fun times!!

We can use these for years to come. And as we have more children, we can add to our collection of Recycled Christmas Card Place Mats!

Thanks for reading my Recycled tutorial. Green so easy, even a Toddler can do it!

This week I am joining in Skip to My Lou's Made by You Mondays. It is my first time linking up, but I hope it isn't my last!


Labels: , , , , , , ,

Wednesday, November 24, 2010

Toddler Wonderland Tutorial ~ Santa Hat


So excited to have Michell back with another fantastic tutorial! If you aren't already following her blog - trust me, you are missing out! After you read her tutorial if you head over to her blog and leave some comment love Family and Life in Las Vegas Style - you can have 4 extra entries into the giveaway of your choice!


Girl In Air


Isn't this Santa Hat the CUTEST??


Let's Make one!!


Materials
Size I/5.5 mm crochet hook
Your Favorite RED 4 ply yarn
Your Favorite White Fur
Tapestry Needle for attaching the pom pom

Here are instructions for this Santa Hat Newborn to Adult Sizes:


Chain 3, Join.
Round 1: Work 6 SC through the chain. (6 SC total) Mark the first stitch with a yarn marker. Do not join.
Round 2-3: The first single crochet will be worked right in the top of the previous single crochet, working the cap in a continual round. Work 1 SC through each stitch. (6 SC total)
Round 4: Work 2 SC in each stitch. (12 SC total)
Round 5-9: Work 1 SC in each stitch around. (12 SC total)
Round 10: *Work 1 SC in each of the next 2 Stitches, work 2 SC in the next stitch. Continue around from *. (16 SC total)
Round 11: *Work 1 SC in each stitch around. (16 SC total)
Round 12: *Work 1 SC in each of the next 3 stitches, work 2 SC in the next stitch. Continue around from *. (20 SC total)
Round 13: work 1 SC in ea SC around. (20 SC total)
Round 14: *Work 1 SC in each of the next 4 stitches, work 2 SC in the next stitch. Continue around from *. (24 SC total)
Round 15-16: work 1 SC in ea SC around. (24 SC total)
Round 17: *Work 1 SC in each of the next 2 stitches, work 2 SC in the next stitch. Continue around from *. (32 SC total)
Round 18-21: work 1 SC in ea SC around. (32 SC total)
Round 22: *Work 1 SC in each of the next 3 stitches, work 2 SC in the next stitch. Continue around from *. (40 SC total)
Round 23: work 1 SC in ea SC around. (40 SC total)
This is the first place that you can stop increasing and continue on for the length of the cap. The will fit a newborn size head 12"-13" inches.
Round 24: *Work 1 SC in each of the next 4 stitches, work 2 SC in the next stitch. Continue around from *. (48 SC total)
Round 25-27: work 1 SC in ea SC around. (48 SC total)
This is another place that you can stop increasing and continue on for the length of the cap. This will fit a toddler size head 16"inches.
Round 28: *Work 1 SC in each of the next 4 stitches, work 2 SC in the next stitch. Continue around from *. (58 SC total)
Round 29-32: work 1 SC in ea SC around. (58 SC total)
This is another place that you can stop increasing and continue on for the length of the cap. This will fit a child size head 18" inches.
Round 33: *Work 1 SC in each of the next 5 stitches, work 2 SC in the next stitch. Continue around from *. (66 SC total)
Round 34-43: work 1 SC in ea SC around. (66 SC total)
Continue for the length of the cap. This will fit an adult size head 22"-24".

To end, skip 1 stitch, slip stitch in the next stitch. Cut the yarn and pull the tail through.

Edging
Round 1: Work a round of single crochet with white fur around. Join with the beginning stitch
Round 2: Work 1 double crochet in each single crochet around. Join with the beginning stitch.
Round 3: Work 1 single crochet in each stitch around. Join with the beginning stitch.

Pom-Pom
There are a million ways to make a pom-pom. Just search YouTube and you will see what I mean....
Here is my favorite simple way
1. Wrap yarn around 2 or 3 fingers about 50 times.
2. Slip off fingers and tie a tight knot around middle.
3. Cut loops, trim and fluff
Use yarn needle to attach pom-pom to hat.


Head over to Girl In Air and tell her how awesome this tutorial is! If you tell me that you left a comment on her blog - you can have 4 extra entries!

Labels: , , ,

Friday, November 19, 2010

Toddler Wonderland Tutorial ~ Jenn @ Clean and Scentsible!


Today's guest poster is Jenn from Clean and Scentsible! Her blog is absolutley adorable! Enjoy her post and then got to her blog and tell her how much you enjoyed it. Doing so will earn you 4 extra entries into the Toddler Wonderland Giveaway of your choice. Just let me know you left some comment love, and then have at your extra entries!!


Hello all! I'm Jenn from Clean and Scentsible. I absolutely LOVE Christmas time and am soooo excited to be participating in Walking in a Toddler Wonderland!!

I am here to show you how to make an easy (and cute!) yarn Christmas Tree.


Here's what you'll need:


  • A Christmas tree form (you can use either the foam or cardboard ones but try to find one that actually comes right to a point at the top)

  • red yarn

  • small amount of brown yarn (twine would also work)

  • glue (I like Quick Grip)

  • a piece of tape

  • buttons

  • jingle bells

  • ribbon and candle stand (optional)


To Do:

  1. Place a small amount of glue around the top portion of your tree and then begin wrapping your yarn around the tree. You will only need to use the glue right at the beginning to anchor the yarn down and then again at the bottom of the tree. Continue to wrap the yarn around the tree until you reach the bottom. Try to make sure that the end of the yarn is on the same side of the tree as you started. This will be the back of the tree. Secure again with glue.


  2. Take your brown yarn (or twine) and anchor it down on the inside of the tree. I used tape.


  3. Wrap the brown yarn diagnolly up the tree. Secure at the top with glue.

  4. Take 3 bells and tie them together with a piece of twine. Glue to the top of the tree.

  5. Glue on the buttons (I kind of liked it without the buttons too!)

  6. If you would like, find a pillar candle holder to fit your tree and dress it up with some ribbon.


Thanks so much for having me! I hope you have some fun with the Christmas crafting and Happy Holidays to all!


Thanks Jenn! Don't forget to leave her some kind comments for extra entries!! YAY!

Labels: , ,

Saturday, October 9, 2010

Ghost Post ~ Melissa @ That's Just Crafty!


I'm so excited to introduce Melissa and share her great tutorial on how to make a super cute Halloween Door Sign!

She is one of the craftiest people I know!


In fact, she has a fantastic blog called


Here she is!!

~~~~~~~~~~~~~~~~~~~~~~~~~~~~~~~~~~~~~~~~~~~~~~~~~~~~`


Let me remind you about myself… My name is Melissa and I can be found at That’s Just Crafty!


If you remember, I shared a great product review over the summer on the Sippy Cup Mom.

I am a wife to my great husband Nick. We have a two and a half year old daughter Genevieve and we are expecting baby #2 in April 2011. And if being a full-time stay-at-home mom with morning sickness doesn’t keep me busy enough, I am currently working on my Masters in Education in Family and Consumer Sciences. Basically that means I want to be a Home Economics teacher and share all my crafting and cooking abilities with the next generation!


Doesn’t that sound fun…I thought so!


I’m so excited that Sippy Cup Mom asked me to be a part of the Halloween Tutorials. I love Crafting, so I knew right away what I wanted to share with you!


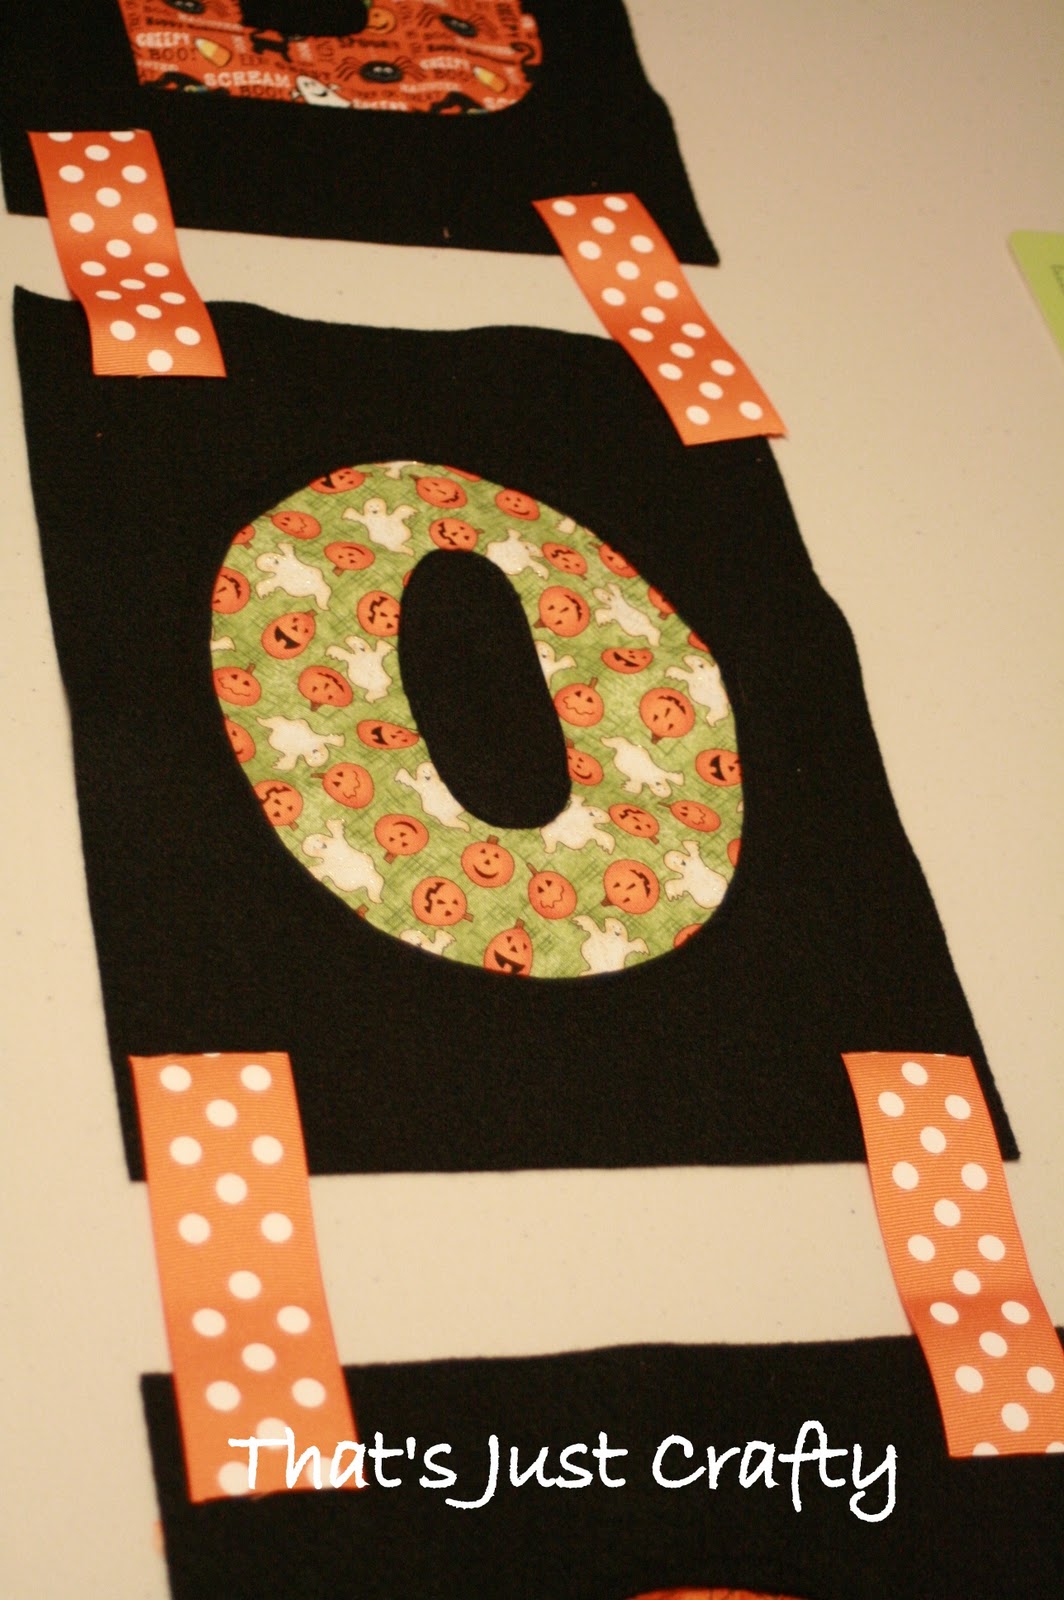
I’m going to show you how to make a “BOO” Halloween Door Sign!


It’s very simple to make all you need is:


· 3- 8.5x11 black felt squares (can be found already cut at any fabric store, even Walmart)


· 3 different coordinating Halloween Fabrics


· 1 roll of ribbon


· “B” & “O” paper template (Just made on Microsoft Word)


· Black Thread & a Sewing Machine (not pictured)


Step One:


Center the B and O templates onto the center of the black felt. Cut around the letter. I used my rotary cutter in some spots. Make sure you save the O to use on twice on two black felt squares.


Step Two:


For the insides of the B, I did not cut out while the big letter was on the felt. I took the negative space of the B and used the insides of the paper template that I cut out. For the O’s, I did cut the center with the rest of the letter…they are bigger and easier to cut.


Step Three:


Next you will want to decide the order of your fabrics. Cut enough of the fabric to go behind the cutout of your letter. And go pin happy, pinning the fabric to the back side of the felt letter.


Step Four:


You will then need to sew around the inside edge of each of the letters to secure the fabric in place. If you don’t have a sewing machine, a hot glue gun may also work. You will also want to place your center pieces of the B and O’s onto the fabric, secure with pins, and sew in place (sorry, no picture of that).


Step Five:


And finally you will want to decide on the spacing between your letters and cut the ribbon out. You will also need to decide on the length you want the ribbon on the top of the final sign. Pin all ribbon in place to the back side, connecting the black felt letters together. Also pin the top ribbon in place. You will sew the ribbon into place.

And there you have it - a BOO Halloween Door sign!


This sign could be adapted in many different ways. Change colors, size, fabrics, and sayings for different holidays. It could even be done horizontally instead of vertical in a banner style. Easy, Cute, and Fun! I hope you have fun making your own BOO Halloween Door Sign!


~~~~~~~~~~~~~~~~~~~~~~~~~~~~~~~~~~~~~~~~~~~~~~~~~~~~~


Isn't that the cutest Halloween door sign?


I love it!


Melissa also made the cutest trick or treat bag for her adorable daughter, Genevieve!


Here are some links to tote bag tutorials that Melissa found:


http://sewmamasew.com/blog2/?p=514


http://www.skiptomylou.org/2009/07/17/how-to-make-a-simple-reversible-totebag/


http://www.thelongestyear.typepad.com/EasyToteTut.pdf


Have fun!

Labels: , ,

Friday, October 8, 2010

Creepy Crafts ~ Michell @ Girl in Air


Today we have two wonderful Tutorials for you. Early we shared Sara's super easy and fun treat bag tutorial, and now we are fortunate to have Michell here from her super fun blog Girl In Air.

Photobucket

She is going to show us how to make some fun decoration blocks. These are super cute, easy, and very affordable!!


I love to change up my Home Decor with the Seasons!


BUT


I don't like to spend a ton of money....


These easy and inexpensive to make blocks are just my cup of tea!


Here's how to make and what you need:


Mod Podge and some paint.


Blocks


Did you know that Home Depot has a scrap bin???


I got a piece of wood for 51 CENTS!!!!


AND the BEST part is they CUT it for you!!


51 cents is so worth not having to beg the hubby to cut me some wood in his spare time:)


I used a wonderful 12x12 scrap page template from Heritage Makers.
I love them because someone already designed them and all I have to do is order a page!
I could have also added a photo but that's for a later date....I'm making decor blocks for each season with a picture of our family
They are about $3.95 and cheaper the more you buy.....
Here some other wonderful templates:


Cut your 12x12 page...


I used a matching color and painted the edges of each block..


Then glue each square with Mod Podge on front and back of each block....let dry and.....


Decorate!


I LOVE my new Halloween Blocks!


Four Decor Blocks for less than $4!

~Please check my blog for many MORE great ideas.~

Photobucket

Seriously, how fun are those blocks!! I can't wait to try them myself!! If you go over and "treat" her blog, and leave a comment saying you're from Mommy's Lil Monster Bash you can have 4 extra entries into any giveaway.


Just comment "I commented on Michell's blog and told her her blocks were spooktastic!" on the giveaway of choice. (4 separate comments)
(Divide them up, use them all for one giveaway, it is your call!!)

BOO!!

Don't forget to enter some of the 20 Giveaways that are going on until October 9th (that is tomorrow!!) before you leave. See the SideBar for links to each Giveaway!!

Labels: , ,